PhiBrows Micro-blading Explained
In this tutorial, you will see a complete eyebrow micro-blading process in action. This video was provided by sharareh vahedi Beauty Salon. To join our classes or book our services, please contact us at
Instructions:
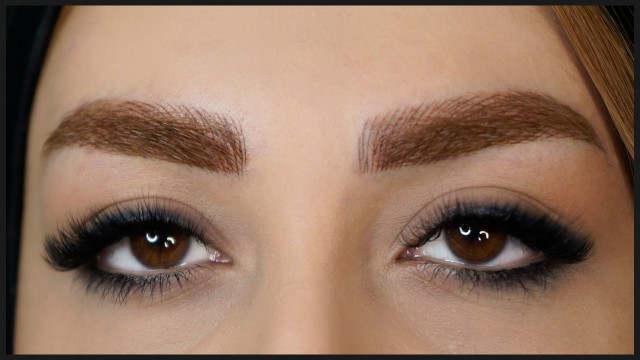
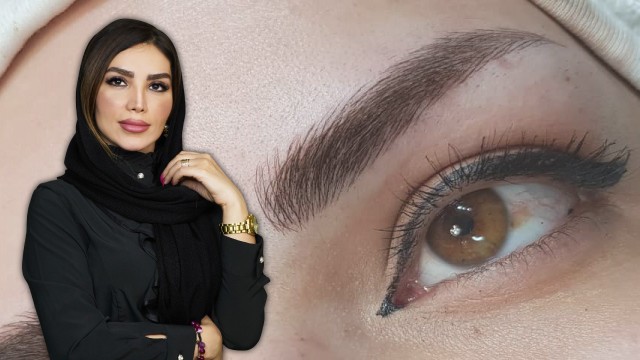
Greetings. First of all, I want to thank you all for being with Shokoofe Baran Beauty center today and watching this video. Today I want to talk to you about eyebrow blading or micro-blading, which is the latest method for cosmetic tattoos using PhiBrows techniques. Using this method, we can create thin natural looking lines on the client’s eyebrows.
It’s better if the eyebrows you apply this method to haven’t been tattooed before. If the eyebrows have been tattooed before, it’s better to clear the old tattoo and get close to natural skin color as much as possible and then perform the micro-blading process. If the client persists, it’s possible to apply micro-blading on an already tattooed eyebrow, however, you must let the client know that the hachure will not be as visible as it is on natural skin.
To start our micro-blading process today, we first start with an eyebrows design. During design, we always strive to reduce or cover defects. If the tail of the eyebrow is too low, we try to bring it up to make the person look younger. If the crown of the eyebrow in too low,
We try to manage that as well because if the crown is pointing down too much it can make the person look anxious and angry. We try to bring the tail of the eyebrow up a bit during the operation because, as I said before, it can make the client look older than their age. If the lines on the client's face point up, the face looks younger and healthier.
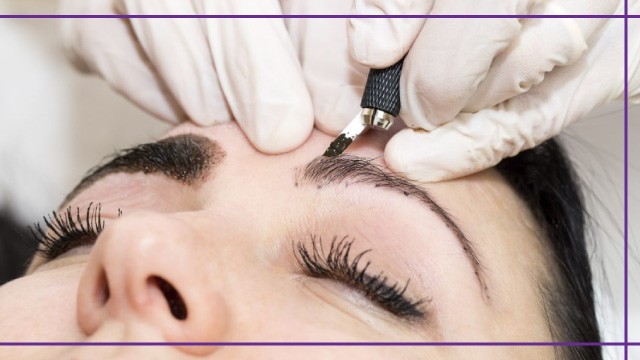
I will start my work by designing the eyebrow. After the design, we will use a surgical pen to draw the lines so they won’t fade away during the procedure. We’ll wait twenty minutes for the ink to dry and we will come back to apply anesthetics. We can start our micro-blading procedure after 45 minutes has passed. You can also use ice anesthetic products during the procedure. I will come back to show you the blading procedure.
The first step for this procedure is to clean the eyebrows using pads smeared in alcohol. All types of oil will be removed from the tissue using this pad. For people with oily skin, you can even use skin scrubs because otherwise, their oily skin will reject the ink. So make sure to clean the eyebrows and the area around them using an alcohol pad thoroughly to make sure the oil is removed from the skin.
To start the design phase, you will need a crooked detailer brush and aqua paint. As you well know, aqua paint dissolves in water. Smear your wet brush in your aqua paint and start designing. Separate the eyebrows from the bridge of the nose by an imaginary line. To indicate the point where the crown of the eyebrows must start, draw a direct line from Ala to the beginning of the eyebrows and draw a line. Do the same for the other eyebrow. This will indicate the start of the eyebrow line. The space between two symmetrical eyebrows must be the same as the size of the eye.
Keep in mind that some noses have Ala with different sizes or asymmetrical structures. This must be calculated and accounted for during your design. Now go in a direct line using your brush, starting at Ala and going past the center of the eyeball and ending up at the arch of the eyebrow and draw a line. Perform the same process for the outer edge of the eyebrow. Line up the brush with Ala and the outer edge of the eye and draw a line at the end of the eyebrow. Do the same for the other eyebrow. Even though the eyes are closed, you always have to ask the client to line the eyes at the center of the socket and use them to create a symmetrical design with this method for the eyebrows. Again, line up the brush on the Ala and the center of the eyeball and draw a line on the arch and then the outer edge of the eyebrow by lining up the brush with the edge of the eyes. These are your border guidelines.
Now for the next step, use your brush to connect the points together with lines. As I said, the more the eyebrow points up, the younger the person will look. Therefore, I can assume the highest point in the line at the edge of the eyebrow to tip the eyebrow slightly upward. I’ll do the same thing for the lower line. I’ll connect the lines together and try to design an eyebrow which is suitable for my client based on their natural face, age, social standing, and more importantly client’s preference.
This is the basic design I have prepared. I’ll let the client see the design and if they approve, I’ll design the other eyebrow and use special rulers to make sure they are symmetrical and correct them if they are not. I will teach you how to work with rulers and Calipers when we come back. I have designed the eyebrows. Since I have not used any type of measuring instrument to fix the differences, you can clearly see that the eyebrows are not symmetrical. This was intentional so I could teach you more about using tattoo rulers and Calipers.
As I said before, we have an imaginary line on the bridge of the nose which shows the middle of our eyebrows. I’m going to position the middle of this ruler on the bridge of the nose so that the line in the middle is directly on the point between the two eyebrows. Using the measurements on the rulers, I can see one of the eyebrows is slightly lower than the other one. So let’s fix this by moving the design a little higher. We can also measure the arch of the eyebrow. The two crowns are the same size. If we look at the measurements,
We can see that the arch is positioned at 6.2 centimeters on one eyebrow and at the other one it’s at 5.5. We will move the arch to 6.2 on the other one as well. Meaning that the arch of the eyebrow should be taken back a bit. Now if we look at the tail of the eyebrow, one is at 9.2 and the other at 9.3. Let’s fix the other one to 9.3 as well.
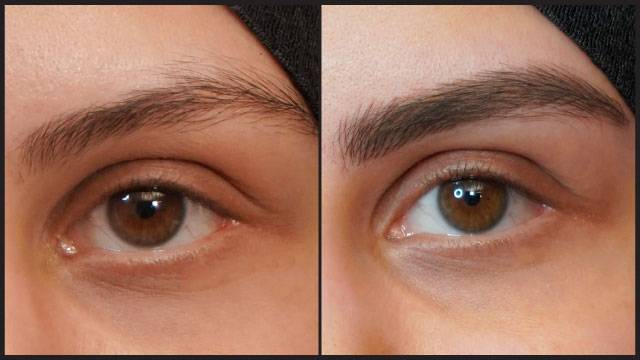
This was how we use our tattoo ruler. Now after using our ruler to measure these points, we have to correct our design. Move the arch a little higher and deleted the line at the lower side of the design to move the eyebrow higher. Now the arches, crowns, and tails are the same on both eyebrows. Every hair strand outside of this design must be shaved off. Keep in mind that in most women, the right eyebrow is lower than the left one. When we work on the eyebrows and after applying color this difference starts to look obvious. This is true for my client here as well. The line of the eyebrow is here, but as you can see, there are still hairs below this line for 2 or 3 millimeters. These hair strands were not so visible before designing the eyebrows, but now they are. These hair strands must be removed otherwise they will make the micro-blading results look thicker. The same thing should happen for the other eyebrow.
As I told you, first we designed the eyebrows and after we made sure the client approves of the design,
We will use a surgical pen to draw on the initial design to prevent it from fading away. Give the ink 20 minutes to dry, then apply anesthetics and wait for 45 minutes. Use a small plastic sheet to blanket the eyebrows during this time. After the allotted time has passed, remove the anesthetic. Don’t worry about the remains of the design with the surgical pen. These lines will fade away as a result of continued scrubbing on the eyebrows during the procedure.
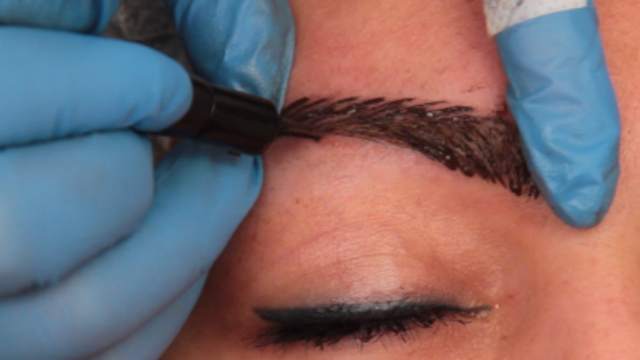
If you pay close attention, you will notice that there’s another line drawn across the eyebrow at the point where the hair growth changes in direction and moves from top to bottom. At this point, you have to draw your hachure from top to bottom in a diagonal line as well. You can perform the blading in two ways. Once you reach this line, you can use the blade diagonally moving from top to bottom across the eyebrow, or you can use the blade to go from bottom to the top and top to bottom until you reach the end of the eyebrow so the lines will cut each other off.
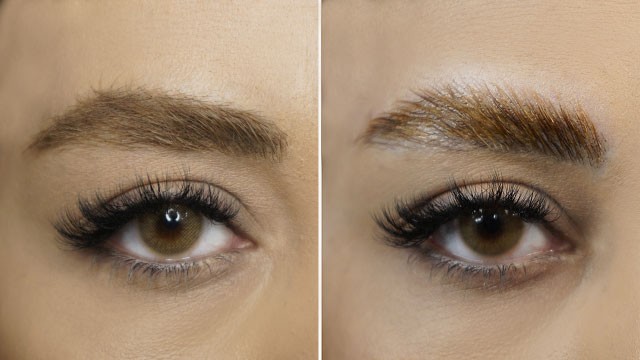
We’ve chosen our color from a mixture of light, medium, and dark brown. If you choose a very light brown, the lines you create using this technique will fade very fast. What’s very important in a micro-blading process is covering the area with the color after every series of hachure. You can redo each line two or three times at most. After that, if there are still areas you think you should work on, you’ll have to do it during a restoration process.
Now I’m going to start the micro-blading process. I’ll smear my pen in the ink and pull the skin using my hand. Start at the beginning of the crown and draw your lines in the shape of natural hair while the blading device is held vertically. Make sure to ask the client if they are in pain or not. Give the process enough pressure and enough time to work. It doesn’t matter whether you move from bottom to the top or the other way around. The closer you get to the eyebrow’s arch the angle of the lines increases. Make sure to draw the lines close to each other to avoid problems in the future.
You can fill the empty spaces between the lines with smaller ones. When you reach the breaking point in the middle of the eyebrow, try to draw the marginal lines first. Each line starts from the middle of the previous lines. I’m going to draw the lines from the bottom up as well here. Now apply some color to the eyebrow and wait two minutes.
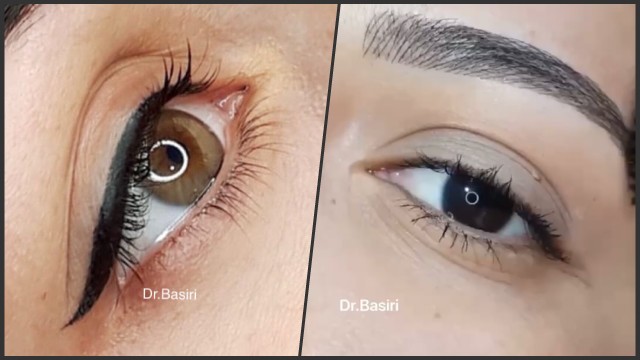
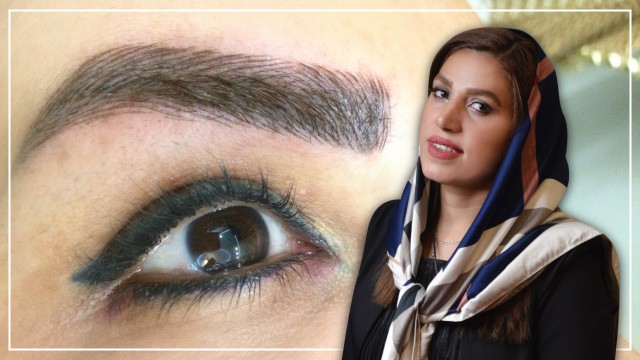
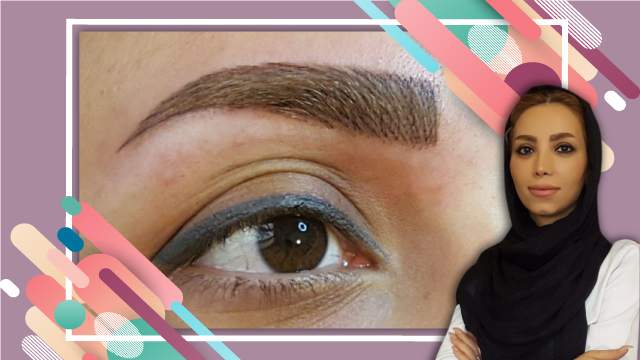
Our micro-blading process is now over. All the lines are drawn in parallel. Remember that after three days the lines will start to mix and some color infusion will happen. Your client might tell you that the work you did does not look the same anymore and the lines aren’t recognizable anymore. You should let your client know that this is natural and invite them to be patient. It’s a good idea to let them know about this before the procedure. This issue is normal during the three first days. Make sure to let them know that they should use vitamin A optic ointment and nothing else. After three days, the lines might even start to fade but after 14 or 15 days, the colors will start to come to the surface and start looking normal again. After 20 to 25 days, you will see the result of this work. You can fix any issues or shortcoming after the 20 to 25 day period. You can see the hachure here.
I hope you have enjoyed this video and it’s been useful to you. I would like to invite you to join us in learning this beautiful art and technique. Have a great day and goodbye.