How To: Hair Ombre & Balayage
In this tutorial, you will learn more about balayage and Ombre techniques. This video was provided by Mrs. Zahra Karimi.
Instructions:
Greetings. I am Zahra Karimi. I am a hairstyle and formula expert and instructor. Today I want to talk to you about Ombre and balayage. I want to tell you all about hair separations and teasing.
When we talk about Ombre and balayage, we usually think this means teasing the hair and wrapping it inside a foil layer. However, other factors count during an Ombre and Balayage process, which I want to talk to you about today. The first factor is the type and size of your brush. Using different brushes with different sizes can give you different types of tease, which will, in turn, affect the outcome of the process.
The second factor is the type of teasing and where you tease the hair. How and where you tease the hair will directly affect the result of the process. The third very important factor is how you separate or section the hair. You can have a static hair separation method and implement it for all types of Ombre, as you do with highlights, and then start teasing the hair. Whenever you have your client show you a picture or tell you an Ombre style to work on, you have to separate the hair differently. Let’s work on our hair model so I can tell you more about these factors.
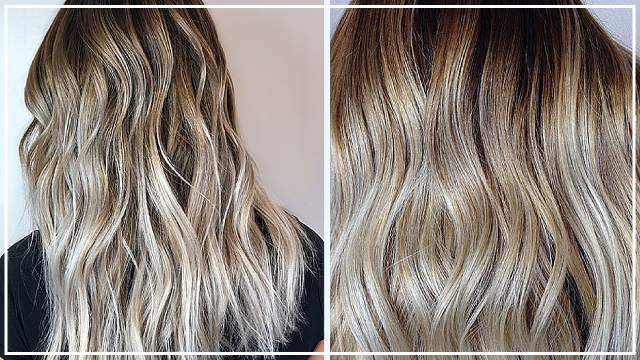
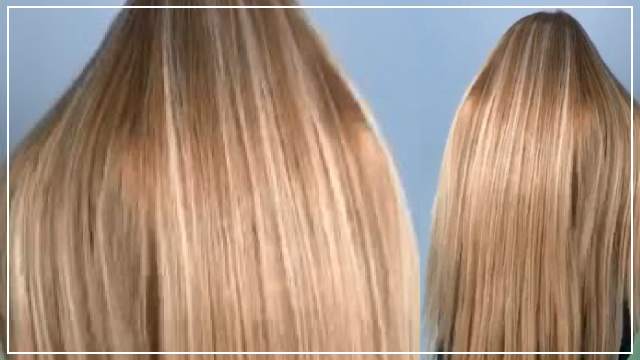
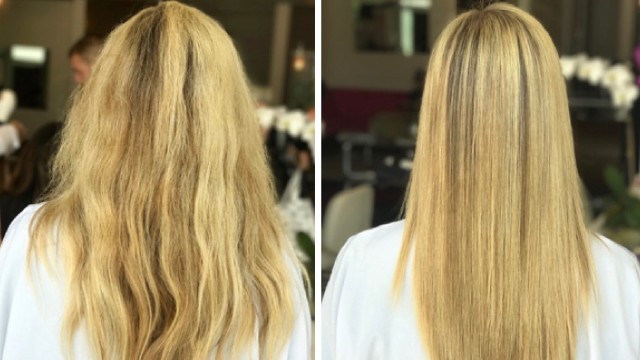
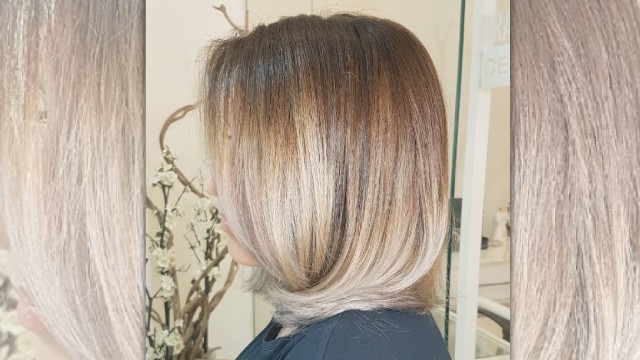
I separated the hair on the hair model like this, which is a typical style of separation. I separated the hair on the top of the head from the two arches of eyebrows and then separated the hair on the two sides of the head until the back of the ears. I also separated the hair in the back and tied it with a hairband. Now we can safely say that we have decided on how to separate the hair. Now we can move to the next phase, which is how the client wants the Ombre to look. Sometimes the client prefers to have the lower part of the hair in a blond hair and the upper area in a darker dye or a lighter one. So, what we need to do is to keep this upper part darker and then bleach the lower part blond.
As you well know, it is very important in an Ombre highlight to avoid making lines on the hair layers. Meaning you have to fade the border where you bleach the hair. When the client asks you to decolor or bleach the lower part of the hair, you have to use a brush with tighter teeth. To tease the hair, put the brush on the border where the hair is to be bleached, hold the hair loosely, and then start teasing the hair toward the root. Stop teasing the hair right here and do not go any further. As I told you, I tease the hair using a tight brush to this point and stop teasing when I reach this area.
Now it is time to apply our bleaching product to the hair. With the type of hair separation we have here, we have to apply the product starting in the back, but I want to see the process better, so I will start in the front. If you want to do this using a foil wrap, you have to bend the tip of the foil, apply some product to it and then put the hair on the foil. Apply more product on top of the hair layer using your brush, and make sure the majority of the product is applied to the lower part of the layer. Then use the brush to push the product upward toward the border with the teased hair. We will not move any further than the border where we teased the hair. The point is to fade this line. Bend the foil in an orderly manner and move to the next layer.
We finished wrapping this layer in foil. I want to repeat the process one more time so you can learn better. Since we decided on the border where we want to bleach the hair, we put the brush on the border where the hair is to be bleached, hold the hair loosely, and then start teasing the hair toward the root. We will not push the hair any tighter. This is a unified and corrected tease. If you want to work with a foil wrap, this is the way to do it. Nevertheless, some of my colleagues rather work with foam wraps, which trap less heat than foil wraps. If you want to work with a foam wrap, put the hair on it, apply your product on the hair layer. After getting the product across the hair, we can put the next foam wrap on the hair layer and move on to the next part.
If we had started in the back, we would have finished the work the same way in the back,
Then move to the hair on the sides and then to the top of the head. We will tease the entire hair layers, apply our product and wrap the hair in foil layers. Then when the hair has reached the intended layer of bleach, we will rinse the hair and brush the hair to remove the tease, and then we can apply our dye to the root and hair. Now I will put the second foam layer on the hair and move to tease the next hair layer.
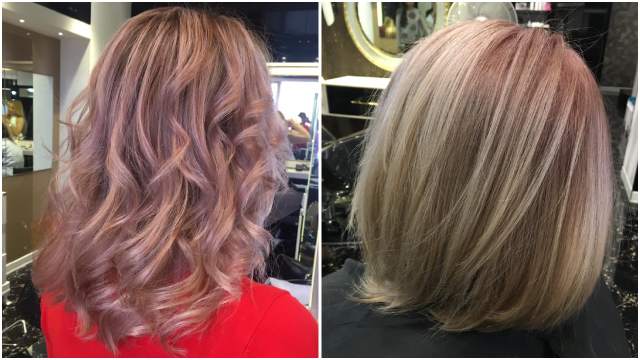
We usually use foil wrap for darker hair because the level of heat generated in a foil wrap is higher and helps bleach the hair faster. Now I want to work on this model to show you another hair sectioning for our Ombre highlight. You might have seen hairstyles where the sides of the hair below the top of the head are lighter, and the top is a little darker. For this hair sectioning, I have separated the hair on the top in the shape of a triangle to the back of the head. If I turn the model over, you can see how the hair is separated in the middle center in the back and the two layers of hair on the side. From the front, you can see how we separated the hair from the middle section. In this type of Ombre, it is very important to consider what the client prefers. As it sometimes happens, the client prefers to have two small light sections of the hair in the front. You must have seen this in most hair models of this kind where the client has light hair, but the part in the front is lighter than the rest of the hair.
I will separate a part of the hair with the length you can see here and put it in foil wrap. Therefore, this makes up the front of the hair, and this is the hair on the side. let’s wrap the part in the front inside a foil. As I said, I will wrap the entirety of the hair inside a foil wrap. As you can see, I did not tease this part. I will apply the product from this part until the end of the layer. This is the part where we want the hair to be lighter. This depends on the client and is not something everyone likes. However, I wanted to explain it because I have heard many students ask about this layer. Make sure to bend your foil neatly, so you can unwrap it easily when you want to check the hair.
In the previous method, we started applying the product in the back or the lower layers of hair, but for this method, we start on the side of the face. This is because we want the side of the face lighter and the top darker. Let’s tease one layer from the side as well. I want to bleach the hair on the side very close to the root. In the previous Ombre, I said we should tease the hair from the middle of the layer, but this time this point is much closer to the root. I will put the brush close to the root and tease the hair while still keeping a little distance from the root.
When I have made sure about the teasing, I will put the hair on the foil sheet. I will continue like this and separate all the layer of hair on the side of the face diagonally. I will tease the hair close to the root and put them inside foil wraps. We will do the same on the other side of the face until we reach the back of the head. For this part, it is much better to separate the hair on the crown of the head. Therefore, we already did the work on the two sides and now want to work on the back. You might be asking what to do if the parts on the sides or the front bleached before we finished the rest of the work. In that case, you just remove the foils for those layers, remove the product and continue the rest of the work.
As I said, we have to separate the hair from the bottom up to the crown of the hair. Start separating the hair from the bottom in straight layers. We will tease the hair close to the root in this area as well. Tease the hair close to the root and wrap it in foil. As I said the sides are to be lighter, and the top will have fewer highlighted layers. We will change our brush and work with a small brush. For each layer, we separate we have to tease the hair from the middle of the layer like the previous one. We do this because we want the top of the head to be a little darker. We want around the head and the back to be light, but the top a little darker. I will finish this and show you the result.
I hope you have enjoyed this tutorial. If you want to learn more about working with hair formulas and hairstyling, you can join our classes. To join our classes, please contact us at the numbers provided in the description. Until next time, goodbye.