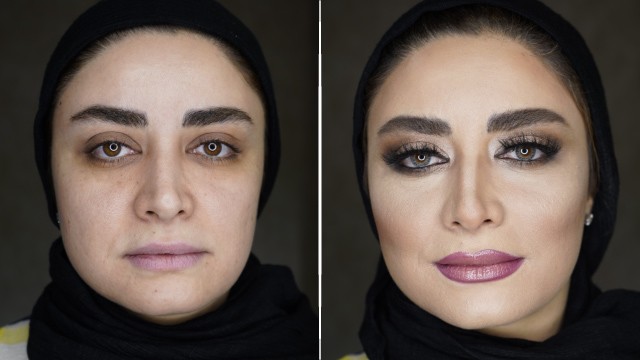
How To: Face Normalization & Makeup For Beginners
In this tutorial, we provide you with a complete overview of facial cleansing, normalization, and makeup process. This video was provided by Mrs. Aghelnezhad
Instructions:
Greetings and good day. In this tutorial, I want to talk to you about the theoretical concepts of makeup. If you are interested in learning how to do professional makeup including bridal makeup, you should pay attention to a few things.
The new products available in the market has made the makeup process much easier, but I still want to give you an overall perspective about what you should concern yourself with when starting a makeup process. One of the most important factors in makeup is applying the basis for the skin and preparing the skin. If you cannot prepare the skin correctly, you will have problems during the makeup even if you are using the best available products. Therefore, the first thing we consider for our makeup is preparing the skin. We have many different types of skin. The first thing each makeup artist should learn is how to recognize different skin types and apply the correct methods to prepare each different skin type.
Mainly, there are four different skin types. The first one is natural skin. Natural skin is like a child’s skin. It is devoid of skin issues, it clear, there are no acnes, and it is not allergic to anything. It is very easy to work with this type of skin and you can apply different types of material from different brands such as foundations, and cream powders. The second skin type is oily skin. Oily skin usually has acne or other defects. Like other skin types, this one also requires its own techniques and material to prepare. The third skin type is dry skin. Dry skins are sensitive to soap, washing, and light. This type of skin is usually opaque and the material you use for this skin type is different.
The next skin type is mixed. This skin type is both oily and dry. You usually have an oily T-zone, which is the forehead, and the nose and the cheeks are dry. This type of skin is usually called a mixed skin type. The next skin type is Couperose skin. This type of skin is very thin and the micro-veins are usually visible on the surface of the skin. These types of skin are very sensitive. It is not easy to work with this skin type and if you are not gentle with the process, the skin will react, get red and effectively stop the process.
This was a brief explanation of skin types. Now let’s see how we can recognize the skin. When you have a new client, you have three ways of recognizing their skin type. The first method is by just looking at the skin. If the skin looks bright or there are acnes, you can categorize the skin as oily, or if the skin looks clear, it could mean that the skin is natural. However, if you cannot recognize the skin by simply looking at it, you can recognize it by touching the skin with the back of your hand. If you felt little bumps on the skin, it is oily. If it is dry then the skin is the dry type. This is how you can recognize the skin by simply touching the surface.
However, there is a third way. If you cannot recognize the skin type using the previous methods to apply the correct material, you can consult the client and ask her how she feels each time after taking a shower. If the client feels very comfortable after each shower and her skin feels great,
Then this skin is oily since after the shower the excess oil has been removed from the skin and the client feels more comfortable. If the client feels like her skin is tight and rough after each shower, then the skin is dry. Therefore, we have three methods to recognize skin type.
After recognizing the skin type correctly, it is important to clean the skin so you can be able to apply a good basis for the makeup. Since the skin is always in contact with environmental factors such as pollution and needs to breathe in the air, it gets dirty and if you do not clean the surface from these elements, you cannot apply a good makeup. Therefore, skin cleansing is a process you can apply before makeup or as a standalone process in your salon. To perform a standalone skin cleansing process, first, you will massage the skin with a cleansing milk product. By default, facial skin is not active, therefore massaging it stimulates the skin and increases blood flow and makes the skin brighter and clearer. Therefore, our first step is to use massage oil or cleansing milk to massage the skin.
How to massage the skin is also a crucial part of the process, which you should learn through classes, but generally, all the movements should be upward during the massage. We know that the skin gets saggy with age and if you massage the skin correctly, you can help lift the skin. Therefore, massage is an important part of facial cleansing. The second step is using a lotion to remove the excess oil from the skin milk or the oil you used for the massage. You should use a pad or piece of cotton to clean the face with upward movements using the lotion.
After using the lotion, you have to clean the face and remove the acne with fumigation. During a fumigation, you can add chamomile or rose water to the mix to have more effective fumigation. After fumigating the skin, we can move on to scrubbing it. Scrubbing will remove all the environmental pollutants from the surface, softens, and cleans the skin. Keep in mind, if the skin has pimples of acne, you should not massage it too much, because you can cause an allergic reaction or irritate the skin. After massaging the skin, using the lotion, and fumigating it, it is time to use the skin scrub.
After applying the scrub to the skin, you have to use another method of massage. You should use your index and second finger to massage the skin with circular rotations upward. After the scrub, the skin is clean and ready to be nourished. The skin mask you use during this process is to supply the skin with nourishing substances. We choose the type of skin mask based on the type of skin. Whether the skin is dry, oily, or any other type. You should leave the mask remain on the skin for twenty minutes. Generally, this is the rule with any type of hair or skin mask you use and you should let them remain on the hair or skin for twenty minutes. Let the material remain on the skin for twenty minutes to moisturize and nourish the skin and remove it when the allotted time has passed.
We have different types of masks, which come in the form of gel, sheets, and cream, and we use them depending on the skin type. After using the mask and nourishing the skin, we should use a sun-blocking cream. Before the sunscreen, we will use a protective cream. I should recommend that after a skin cleansing process, you should stay at home for a few hours since the skin is devoid of pollutions and different environmental factors will affect it more.
Now we are at a stage where we have already applied all the skin cleansing and protective methods and want to start the makeup process. Generally, face normalization and makeup are two different procedures, but we usually do not end the process with normalization and apply makeup as well to make the face look better. If we want to talk about the history of makeup, we will have to go to ages ago during the Stone Age. Nevertheless, let’s talk more about how we think about face normalization and what methods we use. We usually apply the normalization by formulizing facial parameters and sizes.
Therefore, we can say that face normalization and makeup is mainly based on mathematics and following this mathematical triangle,
We can apply the makeup and normalize the face. Different cultures indeed define beauty differently, but generally, beauty depends on the form of the face. Faces are different both from a size perspective and from their natural geometric form. An oval-shaped face is traditionally known as a normal form and if a face has a different shape,
We can use contour to change its geometric form. Today, cosmetic experts think differently, but still, we try to equalize the sizes based on the natural form of the face. This means the sizes should be equal starting from the growth line at the top of the forehead reaching down to the middle of the eyebrows, and from there down to the tip of the nose, then from there to the base of the chin. If you want to recognize the geometric shape of the face, you have to put the two hands under the jawline and the back of the cheeks as you see here to see the real shape of the face.
There is a theory that states that the geometric shape of the face corresponds with the character of a person. For example, people with rectangular faces are more conservative and reserved, or people with square-shaped faces are thinkers. Regardless, as cosmetic experts, we have to embolden the strengths and hide the weaknesses when it comes to makeup and we do this based on the rules of cosmetic and makeup. The expression and mimic of our face are determined mainly by the highlights and shades formed on the face when light is shining on it. We use these highlights and dark shades during our face normalization to hide the defects of the face and strengthen its beauties.
Nowadays, new methods have been added which I will explain as well. In the past, the first makeup productions, which were used for normalization, were color palettes, shadowing palettes, derma colors, supra colors, and different oily and dry cream powders, which were often used. These days, these products are mostly used for cinematic makeup only and better materials are available in the market, which can make your job much easier. One of the things you should do to get better results is using high-quality material. If you want to be the best and have many clients, you must use high-quality material, regardless of how much information you have or how professional you are and how many years of experience you have in this field. You will only succeed if your clients are happy with your work, and they will not be happy if you use low-quality products.
Besides, using good material will make your job much easier and faster and you will have much better results as well. The process of makeup has become much easier these days in a way that after cleansing the face, you have foundations, under base material, and primers available in the market, which can greatly help advance your work. Let’s talk about primers and what they are. Primers are products we use under the foundation and has many different types. We have liquid primers, solid primers, and brightening primers. Primers can close the open pores on the skin, make it smoother, and increases the durability of the makeup foundation. Therefore, the type of primer is very important as well.
Now let’s see how we should use our primer. Primers contain ions, which activate when you massage them on the skin with your hand. When you want to apply the primer, you have to massage the skin by simply touching the skin with your finger. How you use the products is very important and simply acquiring high-quality products without knowing how to use them or how long it takes them to take effect will render them useless. You have to apply the primer to a clean face and if you apply it before a proper cleansing process, the primer will not take effect. If you have a client who has limited time or is too tired to sit for hours, and the face looks tired and stressed, you can use a cold compress or mix an Acetaminophen tablet with milk and apply it to the skin. This will reduce the tiredness and stress on the skin.
Tired and stressed skin will make your work much harder. The skin is comprised of living tissue cells and will react to different factors. If you apply for your best work on tired and stressed skin, you still will not get good results. If you transfer your calm to the client and prepare the skin properly, you will always get better results. Different primers should remain on the skin for different times. Some of them should remain on the skin for three minutes, some five and some for ten minutes, which we cover in our classes in detail. After applying the primer, you can start working with the foundation. We have different types of foundation material including liquids, creams, moisturizers, and foundations that you can mix which we will cover in details in our classes and you can mix them to get a great foundation and apply to the face.
You can proceed with your normalization and makeup in a few different ways. During a normalization process, you have to use three different colors. One is the foundation color, which we choose depending on the natural color of the skin. The color you use for the foundation should only be two degrees lighter or darker than the natural skin color. If you want the skin to be lighter or darker than two degrees from the natural skin color, you will have to do this gradually. If you have a skin color which falls under level one, and you want to take it to a level five, you won’t have a good result if you move all the way darker in one step. You will have to take it to a level three first, and then go to level five, or vice versa.
Therefore, this is how we choose and apply the color of our foundation. Normalization and makeup are much like painting and much like the painter who covers the canvas with a basic color,
We cover the face with a basic color we call a foundation. Now we need two more colors, which means one light color and one dark. You can proceed with the normalization using these two colors. One dark color of the contour process and a light color, which should be lighter than the foundation we used,
For the highlights that we can use to strengthen the areas that we need like the top of the cheeks and length of the nose. We generally have a few areas we need to apply the highlight to such as the middle of the forehead, the chin, two sides of the nose, on the cheeks, and under the eyes. We also have areas we need to contour for which we use our darker shade.
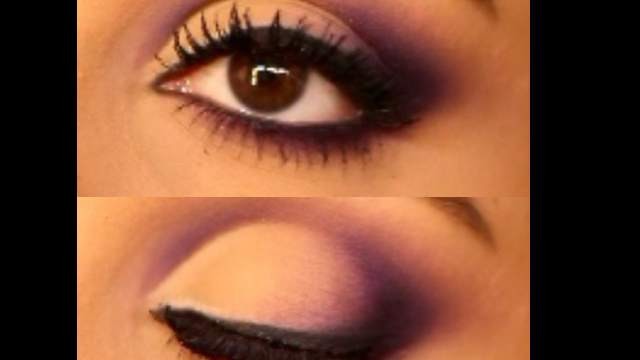
You can either use three different colors then fade them after application, or you can choose the color of the foundation and then use dark and light shades to contour and highlight the face. Nowadays, we also have a new method called strobing. Strobing means to add shine to the face. In some makeup, we also use strobing after contour and highlight such as the Brazilian makeup, which uses the strobing technique as well. If you know how to use the products, know their correct timing, and work with calm and precision, you can be sure to get a good result. After applying the basis, we have to start working on the eyes. From a makeup perspective, the eyes have five different areas. We have different eyes as well. We have round eyes, long eyes, eyes with saggy eyelids, and eyes with a slight protrude slightly from the eye socket. For each of these eyes, we have different methods, which we will tell you. We will also talk about adding cheeks, adding more volume to the face, or making it look thinner and work on them in our workshops.
Therefore, we talked about why cleansing the skin, understanding foundations, using primers, the timing of each product, recognizing the different type of eyes, and strengths and weaknesses are crucial in makeup. Another thing I want to point out is using fillers, which you can use to cover the wrinkles. We also have instant Botox, which we can use to remove the wrinkles for twenty-four hours and helps you with the makeup process. If you want to work in this field, it is much recommended that you should study and understand the techniques so you can succeed.
To join our classes and be certified, please contact us at the numbers provided in the description. I hope you have enjoyed this tutorial. Goodbye.