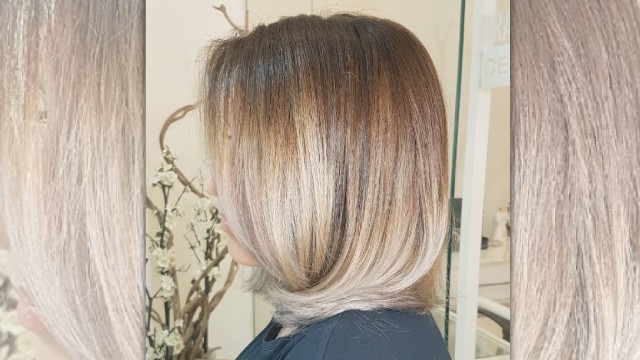
How To: Shadow Ombre Highlight
In this tutorial, we will explain a method called Ombre shadow hair dye. This video was provided by Mrs. Shadi Homayouni.
Instructions:
Greetings. I am Shadi Homayouni. Today I want to talk to you about Ombre highlight technique.
For this technique, we will separate the hair from one ear to the other and start bleaching the hair in the back. You should pay attention to this spacing for this method. For the first layer bleach the hair five centimeters from the root. For the second layer apply the bleaching material seven centimeters from the root, and for the third layer, you should start ten centimeters away from the root. You should keep playing around with these three measurements for layers until reaching the top of the head.
After reaching the top of the head, where you have to apply the same highlight to the hair from one ear to the other, you have to go with ten centimeters, five centimeters, and then seven centimeters. If you want to apply the technique concerning the contour on the face, there are other factors you have to consider, which we have already explained in the previous videos. Therefore, if you have a bony or skinny face, you will apply a fuller Ombre on the two sides of the face and if you have a round face, you will have to be sparser with the highlights.
After applying the bleaching material to the hair, wait twenty minutes to check the hair, re-apply the bleaching material and wait another twenty minutes. When you are sure, the hair has reached nine or ten degrees of whiteness, you can rinse the hair and the hair is ready for a dye. If you remember from our previous videos, we either teased the hair or separated a section of hair in an inverted V shape. For this technique, you can tease the hair, but you cannot separate an inverted V section. You must apply the material on a straight and unify layer of hair.
Let’s apply the bleaching material seven centimeters from the root for this layer. For the next layer, apply the bleaching material five centimeters away from the root. The difference between a foam wrap and a foil wrap is that the foil will trap more heat inside and therefore will bleach the hair faster. It’s better to use foil wraps for thick or very dark hair, and foam wraps for thin or light hair, or when you don’t want to bleach the hair white. We will continue wrapping the hair in foam wraps until we have covered the whole hair. Do the same for the hair on the side of the ears with ten centimeters, five centimeters, and seven-centimeter spacing. Just make sure to pay attention to face contour and if you have a round face, start with ten centimeters,
Then five and seven centimeters at the end. If you pay attention to this method, you will avoid making the face look bigger.
After the first twenty minutes since applying the bleaching material, test the hair by pulling the strands gently to check the state of the hair. If the hair is thick, you can use oxidant number two for the re-application of the material. If the hair is very thick, you can use oxidant number three for more potency. After re-applying the material, you will wait for another twenty to thirty minutes and when the hair has reached a level nine or ten, which is light or very light yellow, we will rinse the hair. After rinsing the hair, remove the excess water and apply the dye, which should be at level four or five. To apply the root dye, you can use level five or four colors depending on what the client wants. Nevertheless, for this technique, we usually go with level four.
If the hair has more than fifty percent white hair, you will start applying the root dye from the front of the hair, and otherwise, you can start in the back. To avoid making the face look more round or bigger, we can start applying the bleaching material ten centimeters away from the root. If the face is big or a little fat and you want to make it look thinner, you can even start fifteen centimeters away from the root as well. However, keep in mind that you will apply the material starting at this point for all the hair layers and you will not change it for different layers like those that I said before. Go with ten or fifteen centimeters for all the hair layers. After thirty to thirty-five minutes wash the hair and start applying the dye. Start applying the dye from the root. Keep in mind that if you go with a chocolate color, you should apply this same color for the whole hair and the choice for colors must have harmony. If you go with a gray color like 4.1, for the root, you should go with a silver or copper color for the stem.
I hope you have enjoyed this tutorial.